Excel Import to SQL Server using SQL Server Integration Services
Introduction
This article contains a complete example of Microsoft Excel and CSV data import to SQL Server using SQL Server Integration Services.
You will find useful tips to get around difficulties and save your time.
You will find a useful configurable command file to run import packages.
You can download example files also.
Table of Contents
- Introduction
- The basics of SQL Server Integration Services
- Excel 2003-2016 and CSV Providers
- SSIS Package Design using Import-Export Wizard
- SSIS Packages Run using Command Line
- Conclusion
- Download
- See Also
The basics of SQL Server Integration Services
SQL Server Integration Services (SSIS) are powerful tools to import-export data between SQL Server/SQL Azure and other data sources including Microsoft Excel 2003/2007 and CSV files.
You can create SSIS packages using two tools:
- SQL Server Business Intelligence Development Studio (BIDS)
- SQL Server Import-Export Wizard.
You can run SSIS packages using the following tools:
- SQL Server Import-Export Wizard when you create a package.
- The dtexec command line utility.
- The dtexecui interactive utility.
- SQL Agent.
BIDS and SQL Agent are not avaiable in SQL Server Express Edition.
Also, in Express Edition, you cannot save a designed package from the Import-Export Wizard,
See a good video how to design an SSIS package using BIDS:
Creating a Basic Package (SQL Server Video)
We will talk about package design using SQL Server Import-Export Wizard.
This feature covers import-export task with Microsoft Excel and CSV files.
Excel 2003-2016 and CSV Providers
Jet OLE DB Provider for Microsoft Excel 2003
The Microsoft.Jet.OLEDB.4.0 Provider is used to import-export data with Microsoft Excel 97-2003 workbooks.
It is named "Microsoft Excel" in the Import-Export Wizard.
This provider is available by default on all Windows platform but has only the 32-bit version.
So, use the 32-bit version of dtexec utility and specify Run64BitRuntime=False in the Debug Options of SQL Server Business Intelligence Development Studio project properties.
ACE OLE DB Provider for Microsoft Excel 2007-2016
Microsoft Office 12.0 Access Database Engine OLE DB Provider is used to import-export data with Microsoft Excel 2007-2016 workbooks like *.xlsx, *.xlsm, *.xlb.
You can download and install this provider using the following link:
Microsoft Access Database Engine 2010 Redistributable
Note that the platform of the provider should be the same as installed Microsoft Office platform.
Also, you should use the appropriate platform versions of dtexec and the Import-Export Wizard.
So, if you have Microsoft Office x64 installed you should install the 64-bit provider and use the 64-bit Import-Export Wizard.
Note that SQL Server Management Studio and SQL Server Business Intelligence Development Studio run only the 32-bit Import-Export Wizard from a shell. So, use the "Import and Export Data (64-bit)" link from the SQL Server Start Menu group to run the wizard.
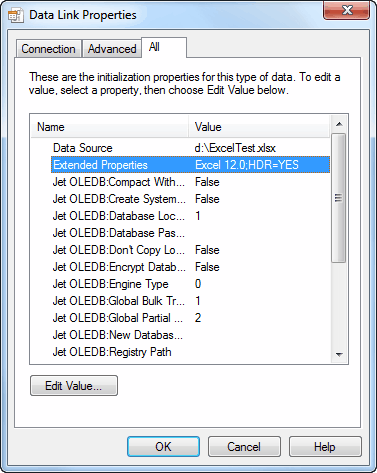
To configure the provider fill in the Data Source value with Excel workbook path and Extended Properties with "Excel 12.0;HDR=YES" value for import to SQL Server from Excel and "Excel 12.0" for export from SQL Server to Excel.
In the 32-bit Import-Export Wizard, you can use the "Microsoft Excel" data source with the "Microsoft Excel 2007" version to configure the ACE OLE DB Provider the same way as for Excel 2003 data source.
Flat File Source Provider
The Flat File Source Provider is available by default and has the 32-bit and 64-bit versions.
SSIS Package Design using Import-Export Wizard
How to Run Import-Export Wizard
You have three basic ways to run Import-Export Wizard:
- Run from SQL Server group in the Start Menu.
- Run from SQL Server Management Studio (Object Explorer, Database, Tasks, Export Data...).
- Run from SQL Server Business Intelligence Development Studio (Solution Explorer, SSIS Packages, SSIS Import and Export Wizard...).
Only the first way allows running the 64-bit version of the Wizard that is required for the 64-bit ACE OLE DB Provider.
Choose a Data Source as Excel 2003/Excel 2007/CSV
On this step, you can use a production path to a data source or a temporary development path.
In the last case, you can specify the path at runtime.
In this example drive d: is used as a path directory.
Excel 2003 as Data Source
For importing from Excel 2003 workbooks, select Microsoft Excel as Data source and Microsoft Excel 97/2003 as Excel version.

Excel 2007-2016 as Data Source
For importing from Excel 2007-2016 workbooks using the 32-bit ACE OLE DB Provider, select Microsoft Excel as Data source and Microsoft Excel 2007 as Excel version.
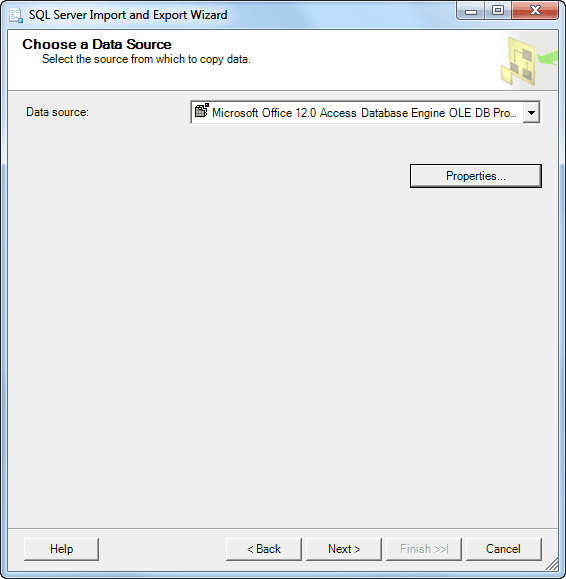
For importing from Excel 2007-2016 workbooks using the 64-bit ACE OLE DB Provider, select Microsoft Office 12.0 Access Database Engine OLE DB Provider.
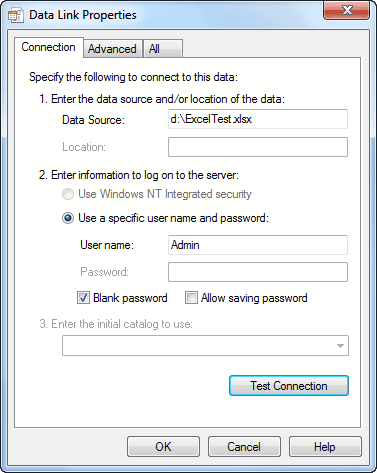
Specify Extended Properties = "Excel 12.0;HDR=YES" and Data Source on the All tab.
The good idea is to Test Connection on the Connection tab.
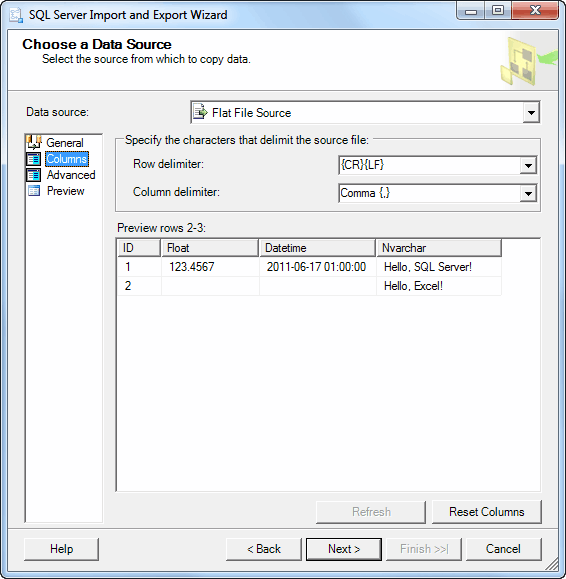
A CSV file as Data Source
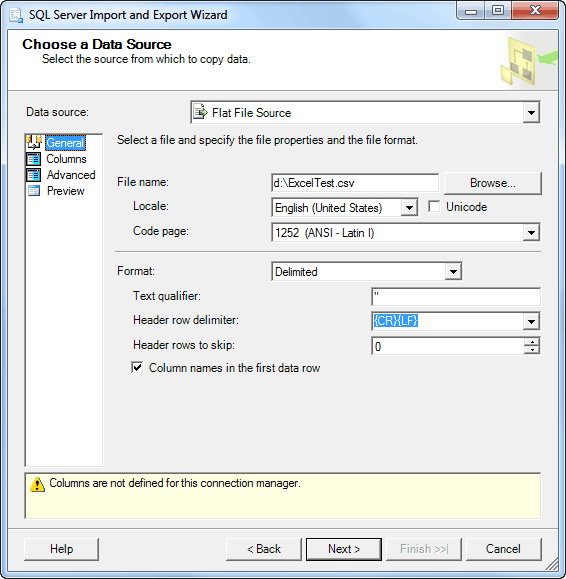
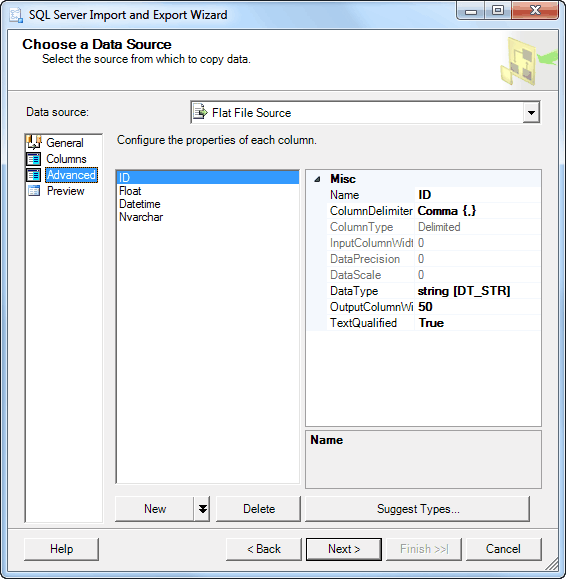
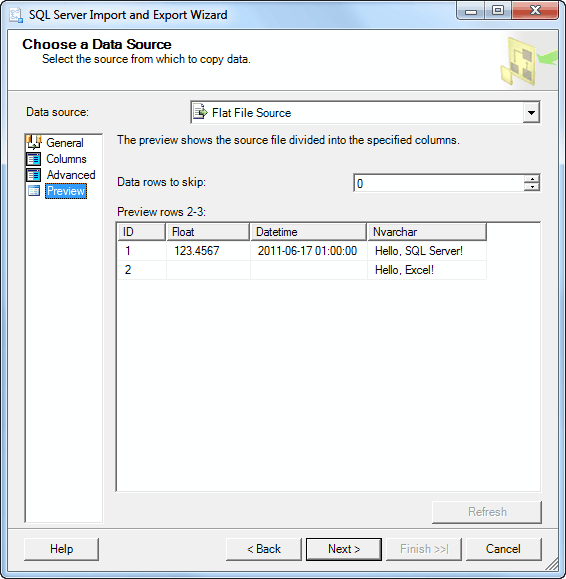
Carefully specify the first three tabs, especially, the "Advanced" tab.
Don't forget to check "Column names in the first data row."
It is a good idea to use "Suggest Types..." button on the "Advanced" tab.
Choose a Destination as SQL Server/SQl Azure
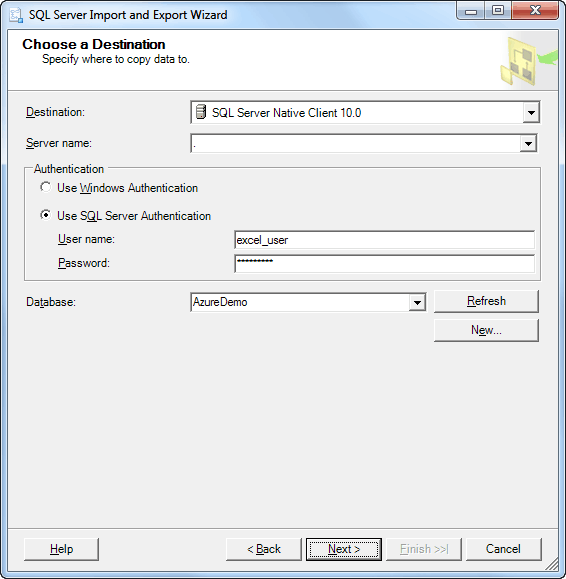
At this step we can choose the following providers:
- SQL Server Native Client.
- Microsoft OLE DB Provider for SQL Server.
- .NET Framework Data Provider for SqlServer.
The only .NET Framework Data Provider for SqlServer allows connecting to SQL Azure at design time.
However, I have an error during the package run using dtexec utility: "ADO NET Destination has failed to acquire the connection". Moreover, I cannot find a solution.
SQL Server Native Client is the best choice, therefore.
For SQL Azure, we can make a design time connection to local SQL Server and then define a real connection string at runtime.
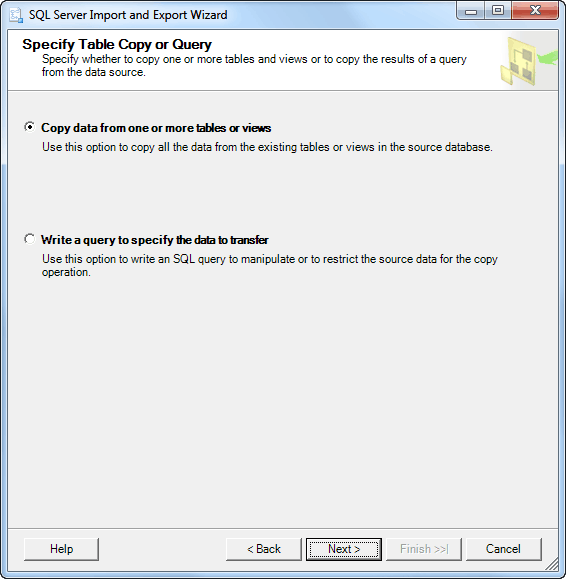
Specify Table Copy or Query
The copying from a table is just enough for Excel/CSV import.
Select Source Tables and Views
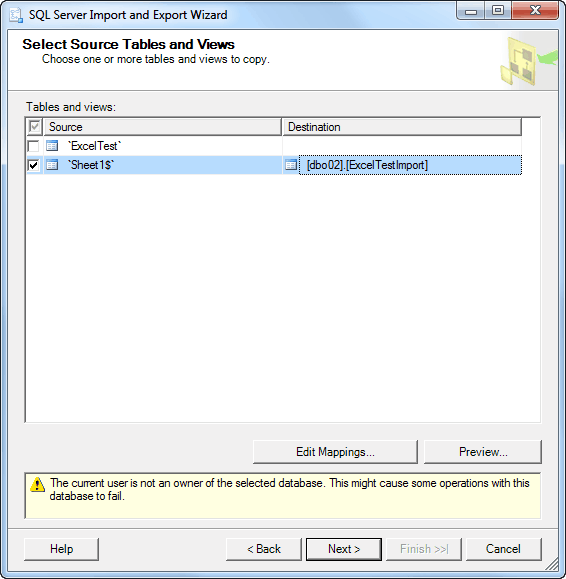
Microsoft Excel has two types of data sources:
- Sheets.
- Named ranges.
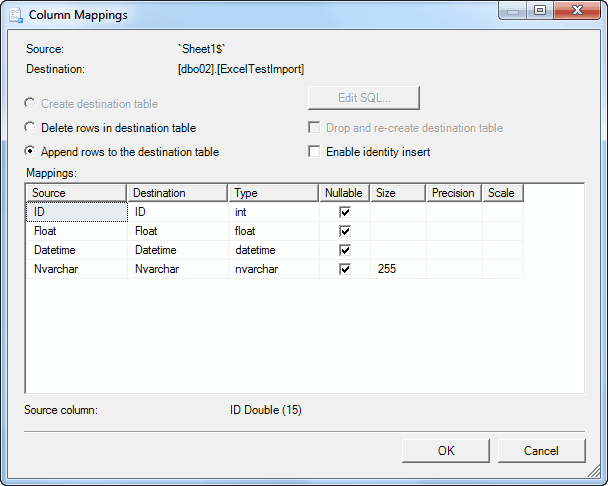
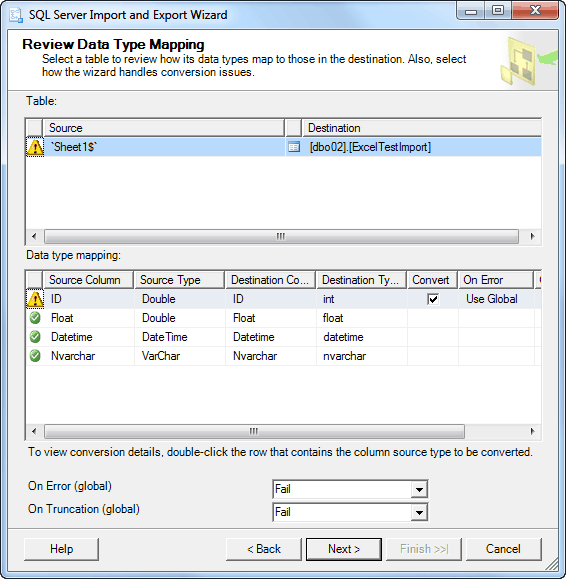
You can see 'ExcelTest' named range and 'Sheet1$' sheet on the screenshot.
Use named ranges if possible because users can add information on worksheets somewhere.
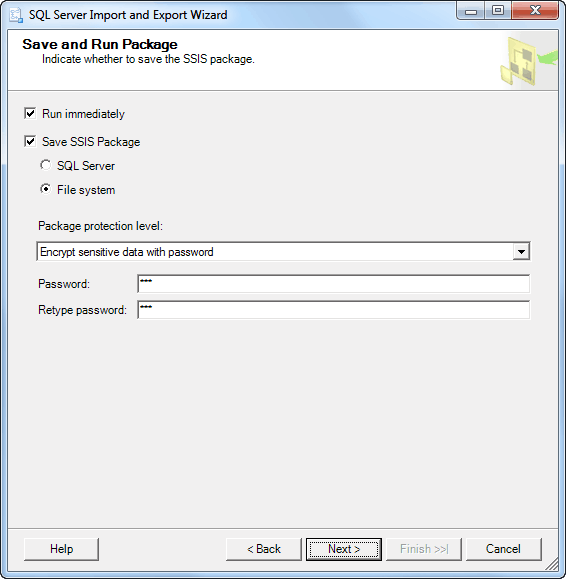
Save and Run Package
The SQL Server Express Import-Export Wizard does not allow saving packages.
There are two options for storing SSIS packages:
- SQL Server
- File system
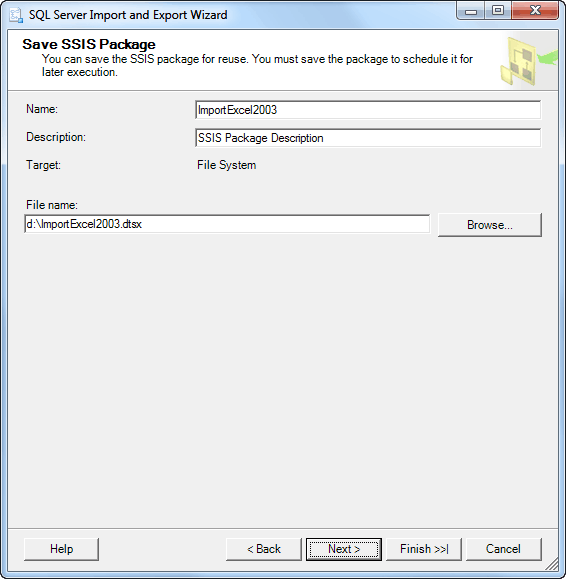
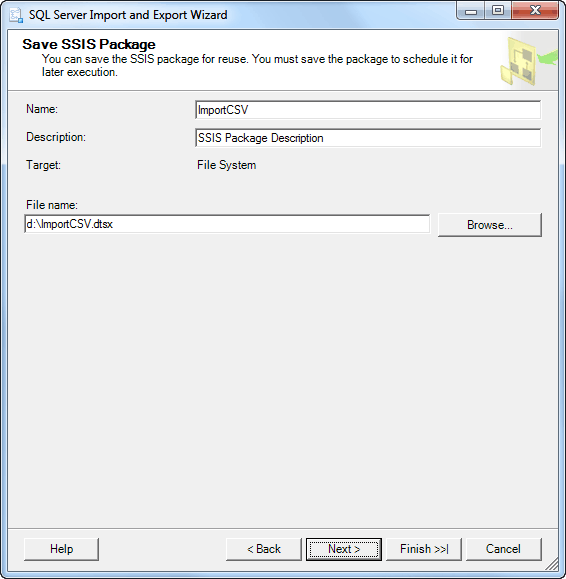
Advantages of the storing to a file system are that you can edit SSIS packages using a text editor and distribute packages easily.
There are some options of the Package protection level:
- Do not save sensitive data.
- Encrypt sensitive data with the user key.
- Encrypt sensitive data with a password.
- Encrypt all data with the user key.
- Encrypt all data with a password.
User key options restrict SSIS package run on other machines. Thus, you cannot distribute it easily.
Encrypt all data options restricts access to an SSIS package text. Thus, you cannot edit it using a text editor.
If an SSIS package does not contain sensitive data, you cannot run and debug a package using SQL Server Business Intelligence Development Studio.
So, the best way for most cases is "Encrypt sensitive data with password".
Password "123" is used in the example.
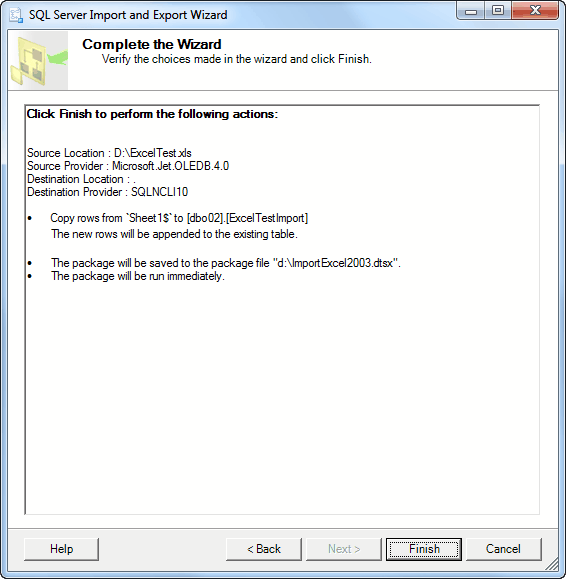
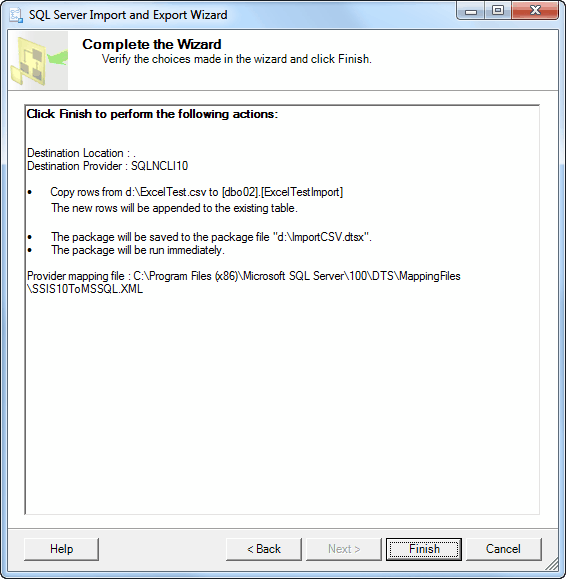
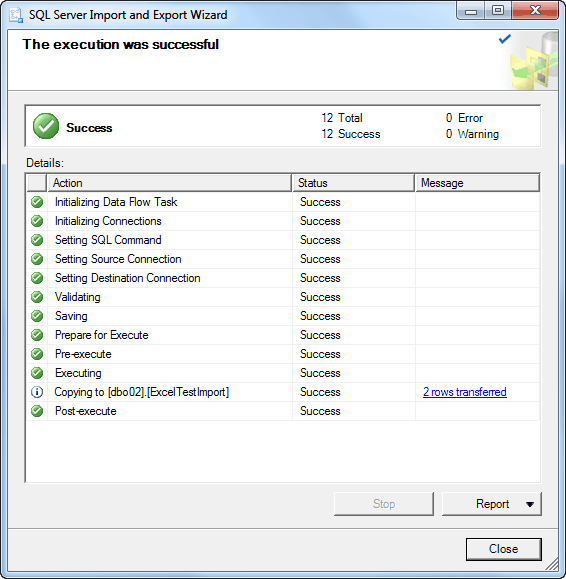
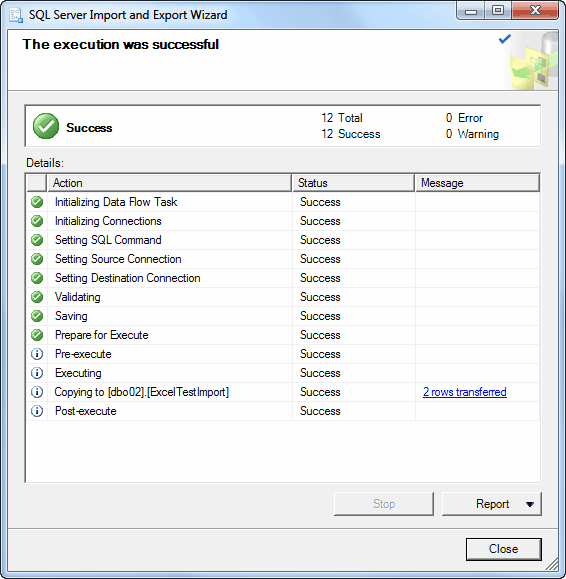
Complete the Wizard
Verify the choices and click "Finish" button.
Datetime/Float/Double/Null Issues of CSV Import
Import from CSV files has some issues:
- SSIS insert default values instead of null values.
- SSIS cannot convert float/double values without fixed scale from CSV files.
For example, the imported Float value is not equal to source value 123.4567, and the Datetime value has datetime value 1753-01-01 00:00:00 (which can be 1899-12-30 00:00:00 if a date type specified).

I know only the one solution for the float/double issue. It is to setup the decimal data type for CSV column using a scale that covers possible scales of column data.
There are two ways to turn on null values:
- Change "RetainNulls" property to true in an SSIS package using a text editor.
- Open an SSIS package in SQL Server Business Intelligence Development Studio, activate the Data Flow tab, select the Flat File Source and set "RetainNull" to True in the property window. Alternatively, click "Edit..." in the Context Menu and check "Retain null values from the source as null values in the data flow."
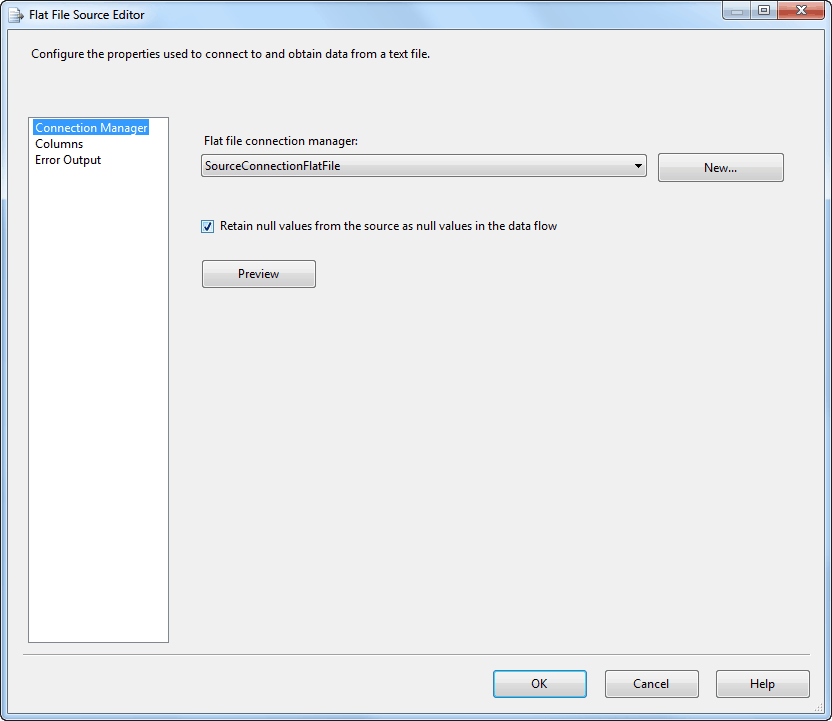
The results with null values.

SSIS Packages Run using Command Line
SSIS Packages Runtime Configuration
The basic command for SSIS package run is
dtexec /file <package> /decrypt <package password>
where a package password is from the "SaveandRunPackage" step of the Import-Export Wizard.
On 64-bit computers, the 64-bit version of dtexec is used by default.
The paths for dtexec executables:
C:\Program Files\Microsoft SQL Server\100\DTS\Binn\DTExec.exe

C:\Program Files (x86)\Microsoft SQL Server\100\DTS\Binn\DTExec.exe
Also, we can modify SSIS package paramaters using /set PropertyPath;Value option.
The SQL Server/SQL Azure destination connection string example:
/set \Package.Connections[DestinationConnectionOLEDB].Properties[ConnectionString];\""Data Source=%server%;User ID=%username%;Password=%password%;Initial Catalog=%database%;Provider=SQLNCLI10;Auto Translate=false;\""
The Excel 2003 source connection string example:
/set \Package.Connections[SourceConnectionExcel].Properties[ConnectionString];\""Provider=Microsoft.Jet.OLEDB.4.0;Data Source=%file%;Extended Properties="Excel 8.0;HDR=YES";\""
The Excel 2007-2016 source connection string example:
/set \Package.Connections[SourceConnectionExcel].Properties[ConnectionString];\""Provider=Microsoft.ACE.OLEDB.12.0;Data Source=%file%;Extended Properties="Excel 12.0;HDR=YES"\""
The CSV source connection string example:
/set \Package.Connections[SourceConnectionFlatFile].Properties[ConnectionString];%file%
SSIS Packages Run Automation
The right technology to run SSIS packages is SQL Agent.
However, we can use a simple and configurable batch file to run SSIS packages.
Let's create import-config.txt for destination SQL Server/SQL Azure connection string configuration:
destination=\Package.Connections[DestinationConnectionOLEDB].Properties[ConnectionString];\""Data Source=ko7h266q17.database.windows.net;User ID=excel_user@ko7h266q17;Password=ExSQL_#02;Initial Catalog=AzureDemo50;Provider=SQLNCLI10;Auto Translate=false;\""
Let's create import-task.txt for SSIS packages configuration:
# Specify x64 platform for ImportExcel2007.dtsx if Office x64 installed

# Source        SSIS_Package            Password    Type    Platform
ExcelTest.csv   ImportCSV.dtsx          123         csv     x86
ExcelTest.xls   ImportExcel2003.dtsx    123         jet     x86
ExcelTest.xlsx  ImportExcel2007.dtsx    123         ace     x86
Here the code of the import-ssis.cmd command file:
@echo off

rem Check and change the paths to dtexec.exe if needed
set dtexec_x64="C:\Program Files\Microsoft SQL Server\100\DTS\Binn\DTExec.exe"
set dtexec_x86="C:\Program Files (x86)\Microsoft SQL Server\100\DTS\Binn\DTExec.exe"
if not exist %dtexec_x86% set dtexec_x86=%dtexec_x64%

rem Reads %destination% variable from import-config.txt
for /F "eol=# tokens=1* delims==" %%i in (import-config.txt) do set %%i=%%j

rem Reads and parses lines of import-task.txt
for /F "eol=# tokens=1* delims==" %%i in (import-task.txt) do call :RUN_ONE %%i %%j %%k %%l %%m %%n %%o %%p %%q

goto END

:RUN_ONE
set name=%1
set file=%~f1
set package=%2
set password=%3
set type=%4
set platform=%5

rem The connection string for the source file
set source=

if .%type%.==.csv. set source=\Package.Connections[SourceConnectionFlatFile].Properties[ConnectionString];%file%

if .%type%.==.jet. set source=\Package.Connections[SourceConnectionExcel].Properties[ConnectionString];\""Provider=Microsoft.Jet.OLEDB.4.0;Data Source=%file%;Extended Properties="Excel 8.0;HDR=YES";\""

if .%type%.==.ace. set source=\Package.Connections[SourceConnectionExcel].Properties[ConnectionString];\""Provider=Microsoft.ACE.OLEDB.12.0;Data Source=%file%;Extended Properties="Excel 12.0;HDR=YES"\""

if .source.==.. goto END

rem The dtexec for required platform
set dtexec=
if .%platform%.==.x86. set dtexec=%dtexec_x86%
if .%platform%.==.x64. set dtexec=%dtexec_x64%
if .dtexec.==.. goto END

echo.
echo %package% from %name%
echo.
%dtexec% /file %package% /Decrypt %password% /set %source% /set %destination% /reporting E > %package%.log
type %package%.log

:END
The download package includes all these files.
Conclusion
If you have SQL Server Standard or higher, you can use SQL Server Integration Services to import data from Microsoft Excel 2003-2016 or CSV files to SQL Server.
Hope that the article tips help you to save your time.
Download
| Downloads | |
|---|---|
| Importing Excel to SQL Server Using SSIS
Shows using SQL Server Integration Services to import data from Excel Version: 1.10 | 11/02/2019 | 0.1MB | Article |
Download |
See Also
- References
- SQL Server Integration Services (SSIS)
- SSIS Package Configurations
- dtexec Utility (SSIS Tool)
- SQL Server Agent
- How-To
- How to: Run the SQL Server Import and Export Wizard
- Creating a Basic Package (SQL Server Video)
- SQL Server Integration Services SSIS Package Configuration
- Downloads
- Microsoft Access Database Engine 2010 Redistributable
- Microsoft Access Database Engine 2016 Redistributable
Contents
Related Articles